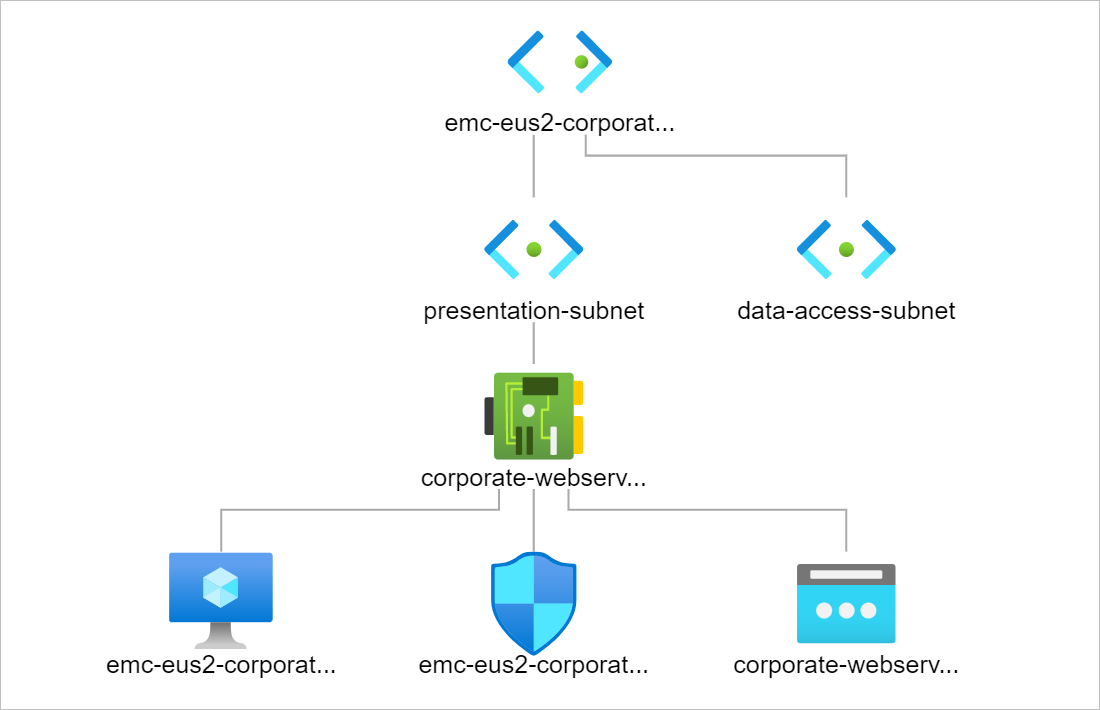
Infrastructure as Code has become the order of the day. In this article, “Configure a Linux virtual machine in Azure using Terraform”, I seek to guide you to building your first Linux Virtual Machine in Azure. Consider these set of steps as a project to enforce your terraform knowledge.
Configure Your Environment
Configure Deployment Parts
Create your vars.tf file
#Variable file used to store details of repetitive references
variable "location" {
  description = "availability zone that is a string type variable"
  type    = string
  default = "eastus2"
}

variable "prefix" {
  type    = string
  default = "emc-eus2-corporate"
}
Create your providers.tf file
#Variable file used to store details of repetitive references
variable "location" {
  type    = string
  default = "eastus2"
}

variable "prefix" {
  type    = string
  default = "emc-eus2-corporate"
}
In the next steps, we create the main.tf file and add the following cmdlets.
Create a virtual network
#Create virtual network and subnets
resource "azurerm_virtual_network" "emc-eus2-corporate-network-vnet" {
  name                = "emc-eus2-corporate-network-vnet"
  location            = azurerm_resource_group.emc-eus2-corporate-resources-rg.location
  resource_group_name = azurerm_resource_group.emc-eus2-corporate-resources-rg.name
  address_space       = ["172.20.0.0/16"]

  tags = {
    environment = "Production"
  }
}
Create a subnet
#Create subnet - presentation tier
resource "azurerm_subnet" "presentation-subnet" {
  name                 = "presentation-subnet"
  resource_group_name  = azurerm_resource_group.emc-eus2-corporate-resources-rg.name
  virtual_network_name = azurerm_virtual_network.emc-eus2-corporate-network-vnet.name
  address_prefixes     = ["172.20.1.0/24"]
}

#Create subnet - data access tier
resource "azurerm_subnet" "data-access-subnet" {
  name                 = "data-access-subnet"
  resource_group_name  = azurerm_resource_group.emc-eus2-corporate-resources-rg.name
  virtual_network_name = azurerm_virtual_network.emc-eus2-corporate-network-vnet.name
  address_prefixes     = ["172.20.2.0/24"]
}
Create a public IP address
#Create Public IP Address
resource "azurerm_public_ip" "emc-eus2-corporate-nic-01-pip" {
  name                = "emc-eus2-corporate-nic-01-pip"
  location            = azurerm_resource_group.emc-eus2-corporate-resources-rg.location
  resource_group_name = azurerm_resource_group.emc-eus2-corporate-resources-rg.name
  allocation_method   = "Dynamic"
}
Create a network security group and SSH inbound rule
# Create Network Security Group and rule
resource "azurerm_network_security_group" "emc-eus2-corporate-nsg" {
  name                = "emc-eus2-corporate-nsg"
  location            = azurerm_resource_group.emc-eus2-corporate-resources-rg.location
  resource_group_name = azurerm_resource_group.emc-eus2-corporate-resources-rg.name

  security_rule {
    name                       = "SSH"
    priority                   = 1001
    direction                  = "Inbound"
    access                     = "Allow"
    protocol                   = "Tcp"
    source_port_range          = "*"
    destination_port_range     = "22"
    source_address_prefix      = "*"
    destination_address_prefix = "*"
  }
}
Create a virtual network interface card
# Create network interface
resource "azurerm_network_interface" "corporate-webserver-vm-01-nic" {
  name                = "corporate-webserver-vm-01-nic"
  location            = azurerm_resource_group.emc-eus2-corporate-resources-rg.location
  resource_group_name = azurerm_resource_group.emc-eus2-corporate-resources-rg.name

  ip_configuration {
    name                          = "corporate-webserver-vm-01-nic-ip"
    subnet_id                     = azurerm_subnet.presentation-subnet.id
    private_ip_address_allocation = "Dynamic"
    public_ip_address_id          = azurerm_public_ip.corporate-webserver-vm-01-ip.id
  }
}
Connect the network security group to the network interface
# Connect the security group to the network interface
resource "azurerm_network_interface_security_group_association" "corporate-webserver-vm-01-nsg-link" {
  network_interface_id      = azurerm_network_interface.corporate-webserver-vm-01-nic.id
  network_security_group_id = azurerm_network_security_group.emc-eus2-corporate-nsg.id
}
Create a storage account for boot diagnostics
# Generate random text for a unique storage account name
resource "random_id" "randomId" {
  keepers = {
    # Generate a new ID only when a new resource group is defined
    resource_group = azurerm_resource_group.emc-eus2-corporate-resources-rg.name
  }
  byte_length = 8
}
Create a storage account for boot diagnostics
# Create storage account for boot diagnostics
resource "azurerm_storage_account" "corpwebservervm01storage" {
  name                     = "diag${random_id.randomId.hex}"
  location                 = azurerm_resource_group.emc-eus2-corporate-resources-rg.location
  resource_group_name      = azurerm_resource_group.emc-eus2-corporate-resources-rg.name
  account_tier             = "Standard"
  account_replication_type = "LRS"
}
Create SSH Key
# Create (and display) an SSH key
resource "tls_private_key" "linuxsrvuserprivkey" {
  algorithm = "RSA"
  rsa_bits  = 4096
}
Create a virtual machine
# Create virtual machine
resource "azurerm_linux_virtual_machine" "emc-eus2-corporate-webserver-vm-01" {
  name                  = "emc-eus2-corporate-webserver-vm-01"
  location              = azurerm_resource_group.emc-eus2-corporate-resources-rg.location
  resource_group_name   = azurerm_resource_group.emc-eus2-corporate-resources-rg.name
  network_interface_ids = [azurerm_network_interface.corporate-webserver-vm-01-nic.id]
  size                  = "Standard_DC1ds_v3"

  os_disk {
    name                 = "corpwebservervm01disk"
    caching              = "ReadWrite"
    storage_account_type = "Premium_LRS"
  }

  source_image_reference {
    publisher = "Canonical"
    offer     = "0001-com-ubuntu-server-focal"
    sku       = "20_04-lts-gen2"
    version   = "latest"
  }

  computer_name                   = "corporate-webserver-vm-01"
  admin_username                  = "linuxsrvuser"
  disable_password_authentication = true

  admin_ssh_key {
    username   = "linuxsrvuser"
    public_key = tls_private_key.linuxsrvuserprivkey.public_key_openssh
  }
}
Terraform Plan
The terraform plan command evaluates a Terraform configuration to determine the desired state of all the resources it declares, then compares that desired state to the real infrastructure objects being managed with the current working directory and workspace. It uses state data to determine which real objects correspond to which declared resources, and checks the current state of each resource using the relevant infrastructure provider’s API.
terraform plan
Terraform Apply
The terraform apply command performs a plan just like terraform plan does, but then actually carries out the planned changes to each resource using the relevant infrastructure provider’s API. It asks for confirmation from the user before making any changes, unless it was explicitly told to skip approval.
terraform apply
Command to find an image based on the SKU.
samuel@Azure:~$ az vm image list -s "2019-Datacenter" --output table
You are viewing an offline list of images, use --all to retrieve an up-to-date list
Offer          Publisher               Sku              Urn                                                          UrnAlias           Version
-------------  ----------------------  ---------------  -----------------------------------------------------------  -----------------  ---------
WindowsServer  MicrosoftWindowsServer  2019-Datacenter  MicrosoftWindowsServer:WindowsServer:2019-Datacenter:latest  Win2019Datacenter  latest
samuel@Azure:~$
samuel@Azure:~$ az vm image list -s "18.04-LTS" --output table
You are viewing an offline list of images, use --all to retrieve an up-to-date list
Offer         Publisher    Sku        Urn                                      UrnAlias    Version
------------  -----------  ---------  ---------------------------------------  ----------  ---------
UbuntuServer  Canonical    18.04-LTS  Canonical:UbuntuServer:18.04-LTS:latest  UbuntuLTS   latest
Command to find an image based on the Publisher.
samuel@Azure:~$ az vm image list -p "Microsoft" --output table
You are viewing an offline list of images, use --all to retrieve an up-to-date list
Offer          Publisher               Sku                                 Urn                                                                             UrnAlias                 Version
-------------  ----------------------  ----------------------------------  ------------------------------------------------------------------------------  -----------------------  ---------
WindowsServer  MicrosoftWindowsServer  2022-Datacenter                     MicrosoftWindowsServer:WindowsServer:2022-Datacenter:latest                     Win2022Datacenter        latest
WindowsServer  MicrosoftWindowsServer  2022-datacenter-azure-edition-core  MicrosoftWindowsServer:WindowsServer:2022-datacenter-azure-edition-core:latest  Win2022AzureEditionCore  latest
WindowsServer  MicrosoftWindowsServer  2019-Datacenter                     MicrosoftWindowsServer:WindowsServer:2019-Datacenter:latest                     Win2019Datacenter        latest
samuel@Azure:~$ az vm image list -p "Canonical" --output table
You are viewing an offline list of images, use --all to retrieve an up-to-date list
Offer         Publisher    Sku        Urn                                      UrnAlias    Version
------------  -----------  ---------  ---------------------------------------  ----------  ---------
UbuntuServer  Canonical    18.04-LTS  Canonical:UbuntuServer:18.04-LTS:latest  UbuntuLTS   latest
At this point, the required pieces to build a Linux Virtual Machine on Azure is complete. It’s time to test your code.
You can learn more from Hashicorp by visiting the following link.
This article was helpful in troubleshooting issues with the Ubuntu SKU.
